Configuring Mail for GhostCMS


This site runs on Ghost Content Management System, also known as GhostCMS or just Ghost. One of the appealing features of the platform is mail-enablement for user account creation, newsletters, comments, and paid tiers, though paid tiers are not something I ever plan on implementing.
For the last couple of years, I avoided configuring email functionality for my site because I did not need it, and mail exchange is something I have only been tangentially involved in during my IT career.
With my wife and I preparing for our upcoming move to New Zealand, she also wanted to create a blog to keep her friends and family in the loop on ours and our pets adventures. Check it out over at https://pawsandpavs.com mind any dust, as she is still setting things up.
While setting up her environment, I ran into an interesting new security requirement: by default, the site administrator must verify any new devices via email. I had not configured email yet, so I was at an impasse. Researching the issue, I found that I could simply disable device verification by adding the following to the config.production.json file or Docker environment variables:
"staffDeviceVerification": falseBut where is the fun in that!
Besides, this site's all about sharing my experience and growing my skill set so hang on tight!
Because this is a self-hosted instance of Ghost running on docker it's up to me to configure mail, the managed version, offered as GhostPro, includes this out of the box. Thankfully, the devs over at Ghost make it relatively simple to setup using Mailgun, which conveniently offers a free tier!
Some of the finer details of this whole ordeal took me a while to find and nail down so I figured why not share here in case someone else is in search of a similar topic.
Before we dive in here keep in mind we will need to configure both API and SMTP for mailing as Ghost uses both in different ways AND Mailgun's pricing/free limits can change so I apologize in advance if this ever becomes inaccurate.
To configure Ghost with Mailgun do the following:
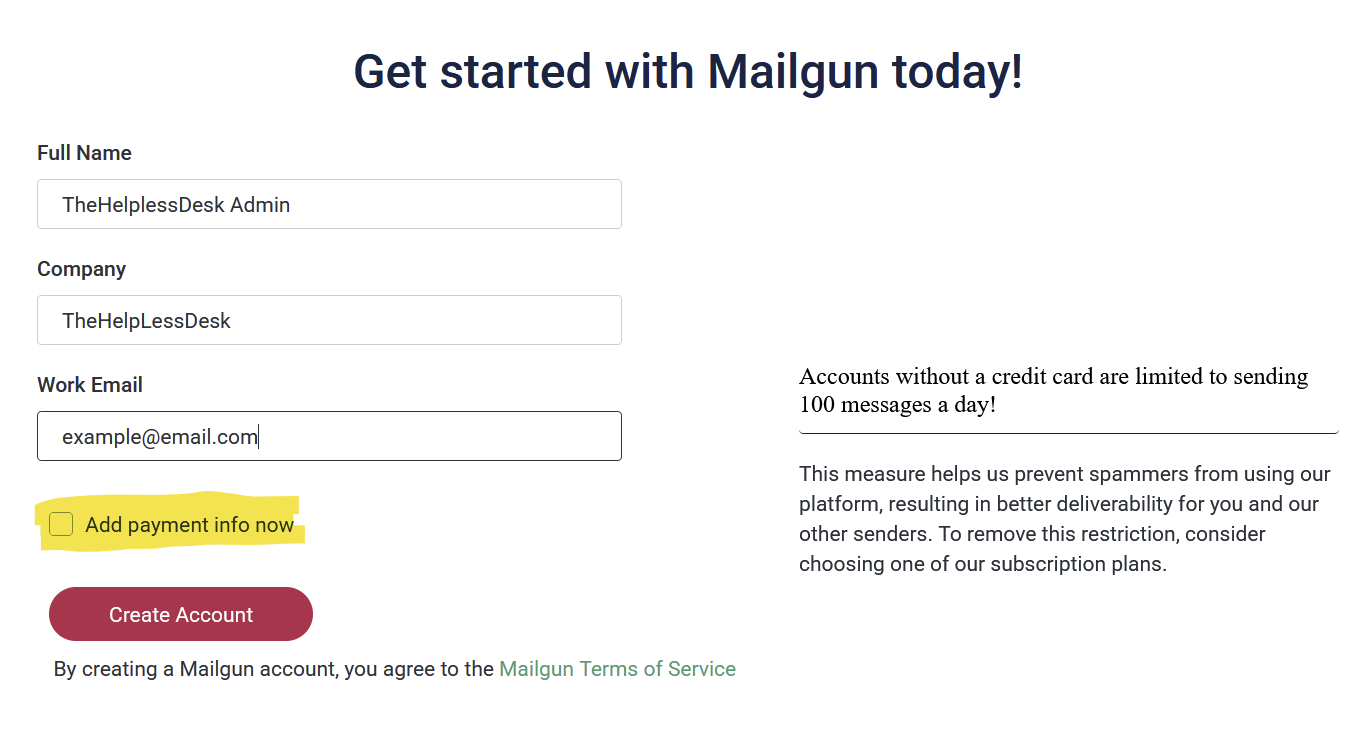
1: Create a free Mailgun account.
If you need more than 100 emails per day you can upgrade your account to a paid plan later.
2: Follow Mailgun’s getting started guide.
- Activate your account, check the email you signed up with to activate your account.
- Skip or add a Team Member
- Send a test email
When sending the test email, replace API_KEY with your generated API key. Copy that key somewhere secure because we will use it again later in the guide.
Mailgun gives you a few different language options to test with. I chose curl.
For example:
curl -s --user 'api:API_KEY'
https://api.mailgun.net/v3/sandboxsandbox123456789abcdefgh123456789.mailgun.org/messages
-F from='Mailgun Sandbox [email protected]'
-F to='Dear Reader [email protected]'
-F subject='Hello!'
-F text='Congratulations, you just sent an email with Mailgun! You are truly awesome!' \
3: Add DNS Entries
This typically consists of a CNAME record and a couple of TXT records. This can be done “automagically” by authorizing Mailgun to connect to your DNS provider directly, or manually if you prefer to configure the records yourself.
While configuring DNS, add two MX records to enable receiving later.
MX | yourdomain.com | mxa.mailgun.com | Priority=10
MX | yourdomain.com | mxb.mailgun.com | Priority=10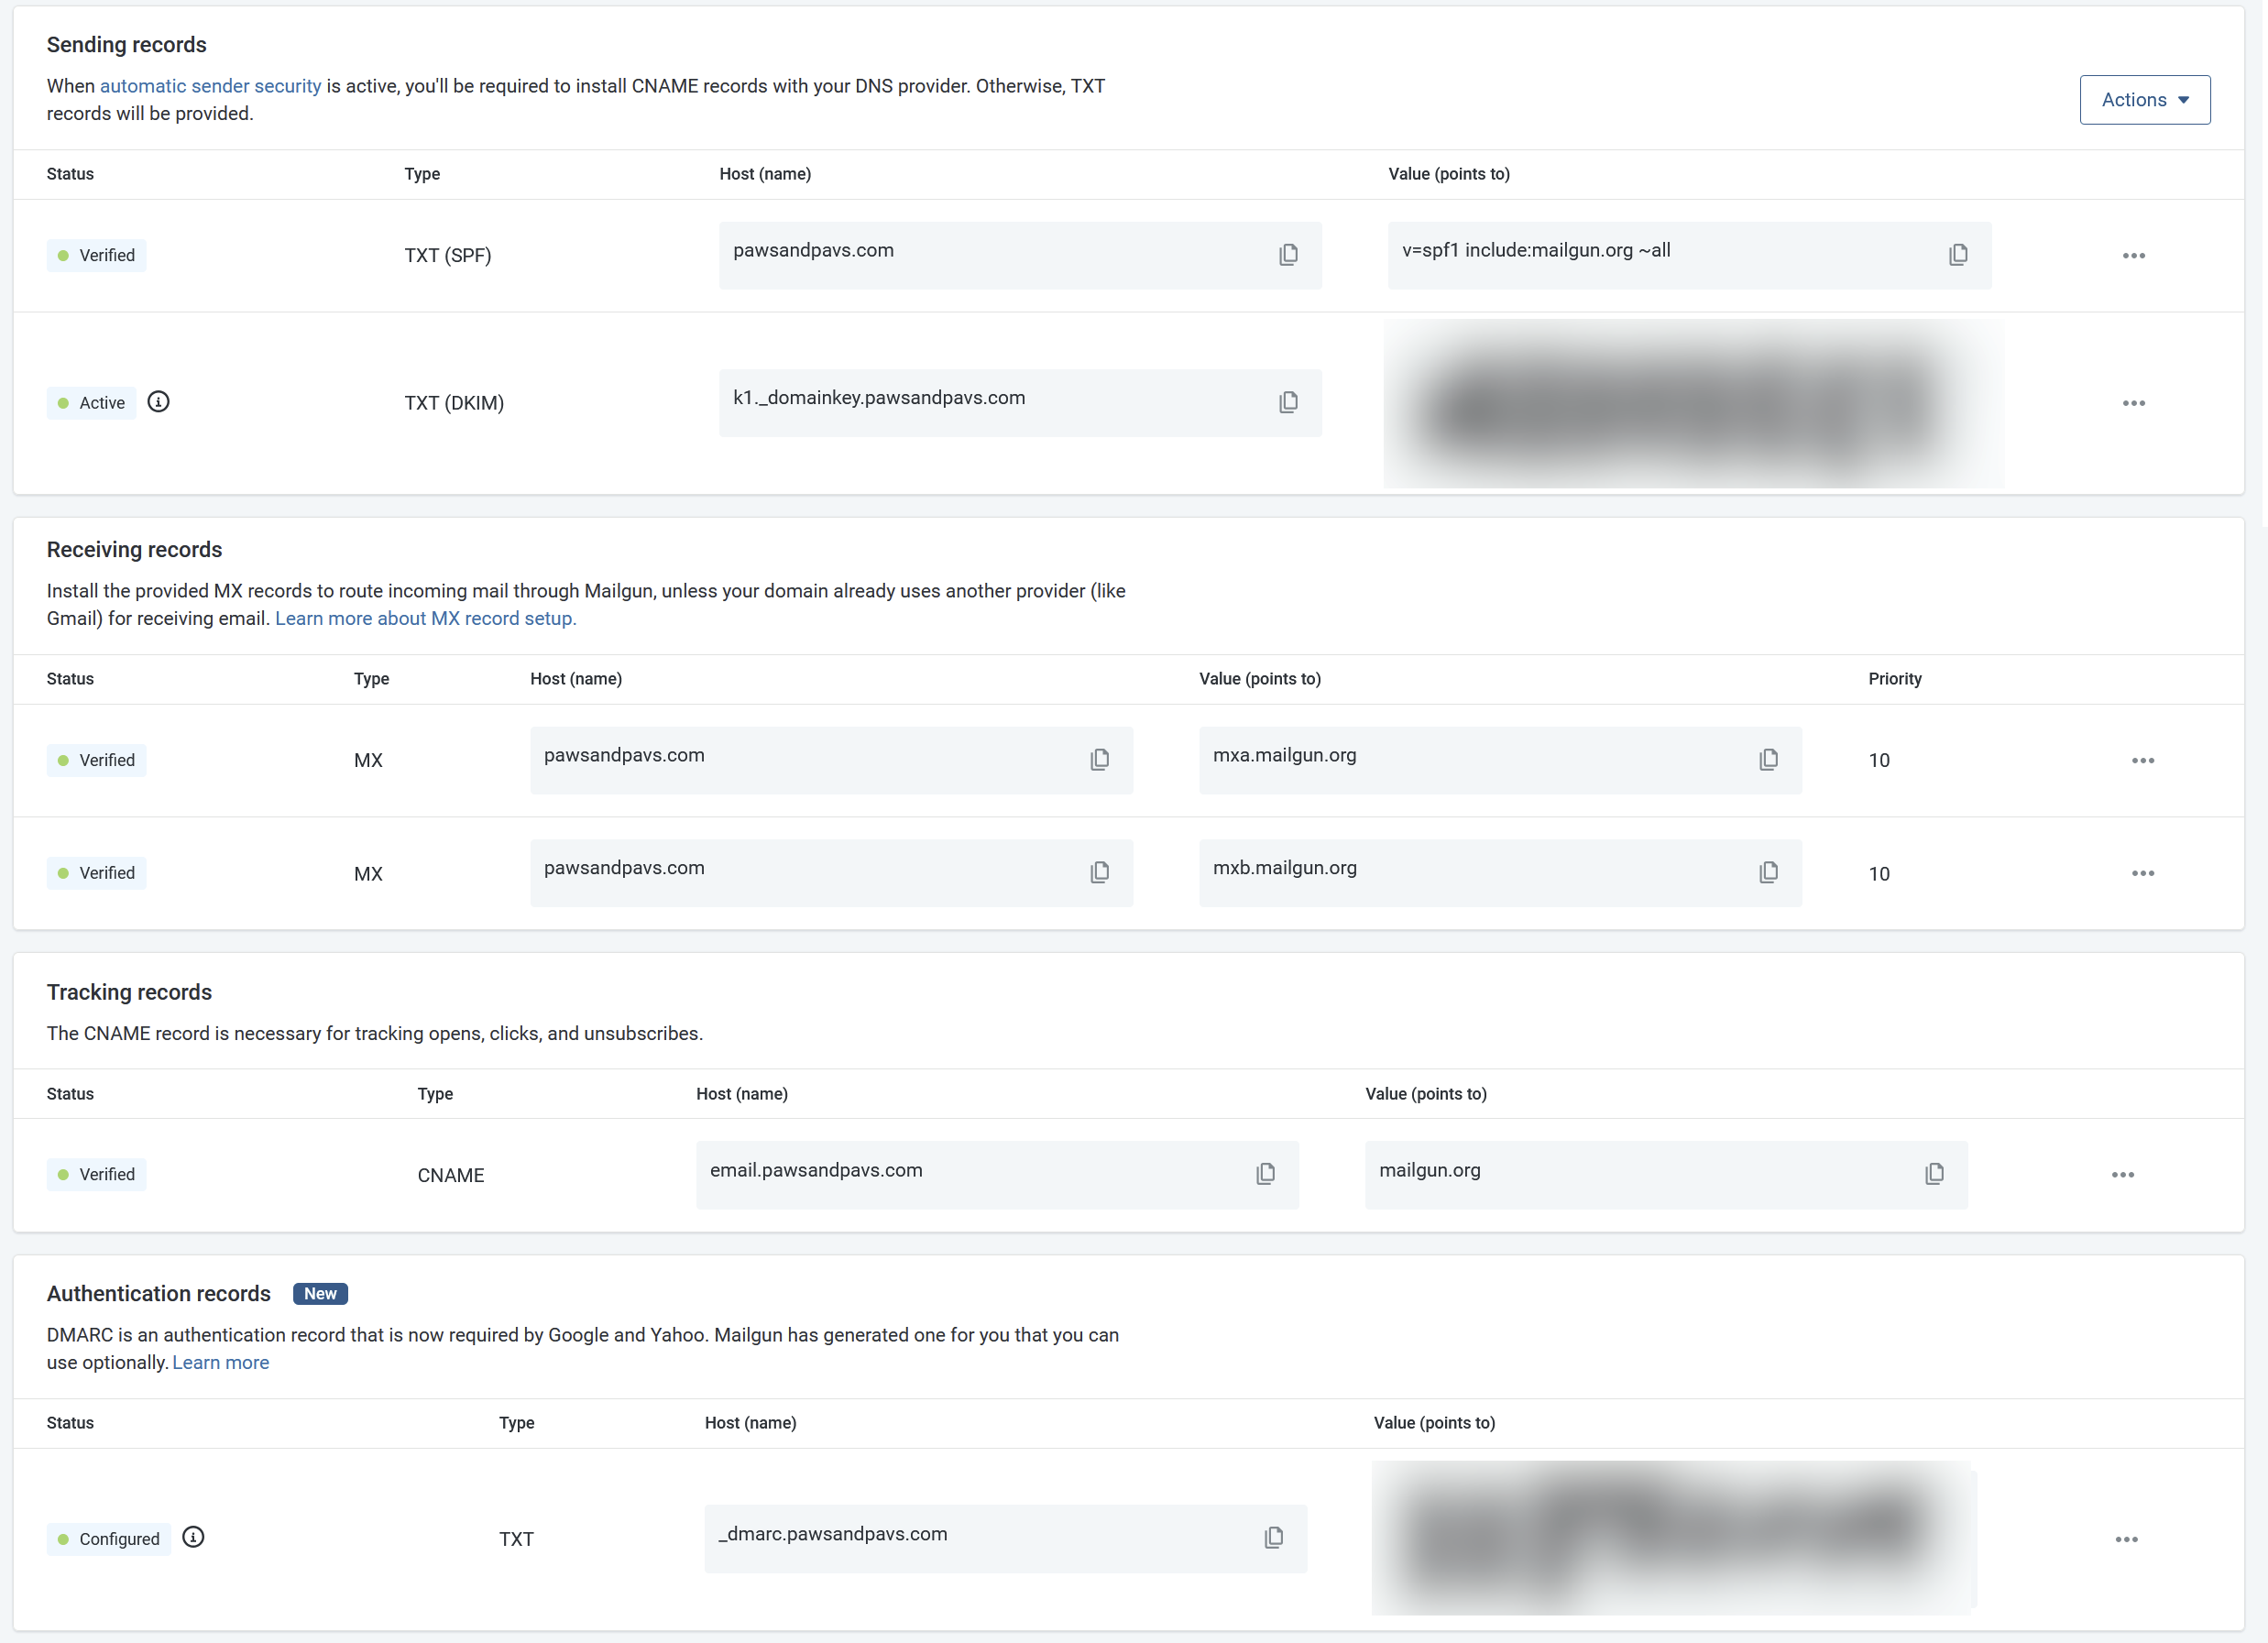
You can use the 'Check Status' button to force Mailgun to check your DNS configuration to enable the next steps.
Once DNS is configured you can test again this time using your production API details, Mailgun should once again supply a useful example command in various languages.
4: Setup SMTP credentials
Once DNS is configured, we can set up SMTP credentials.
In Mailgun:
- Go to Sending > Domain Settings > SMTP Credentials.
- Click Add new SMTP user.
- Add a new user. Something generic like
postmasterworks well. - Generate or enter a password.
- Save this password somewhere secure for later.
5: Configure SMTP in Docker or Ghost Config
With the API and SMTP configured in Mailgun, we can now jump over to Docker and Ghost.
First, let's configure SMTP
If you're using Docker you can modify your environment variables or .env file to support the following (replacing values as needed):
    environment:
      mail__from: "'The Helpless Desk' <[email protected]>",
      mail__transport: SMTP
      mail__options__service: Mailgun
      mail__options__host: smtp.mailgun.org
      mail__options__port: 465
      mail__options__secure: "true"
      mail__options__auth__user: [email protected]
      mail__options__auth__pass: "mailgun-generated-password"
If you're using an installed version of Ghost you will need to modify the mail section of the config.production.json file that lives in the in application settings folder.
  "mail": {
    "from": "'The Helpless Desk' <[email protected]>"
    "transport": "SMTP",
    "options": {
      "service": "Mailgun",
      "host": "smtp.mailgun.org",
      "port": 465,
      "secure": true,
      "auth": {
        "user": "[email protected]",
        "pass": "mailgun-generated-password"
      }
    }
  },
If you notice, the Docker environment variables match the JSON structure. Each nested object is separated by a double underscore __.
For example:
mail.options.auth.userbecomes:
mail__options__auth__userThis is because Ghost maps Docker environment variables into the nested configuration structure.
6: Configure the Mailgun API in Ghost
Now for API, luckily Ghost has a nice built-in integration for this.
- Log in to your site’s Ghost Admin portal, usually located at:
https://sitedomain.name/ghost- Go to Settings > Membership > Newsletters > Mailgun.
- Click Edit.
- Supply the Mailgun API URL and API key we created earlier.
- Click Save.
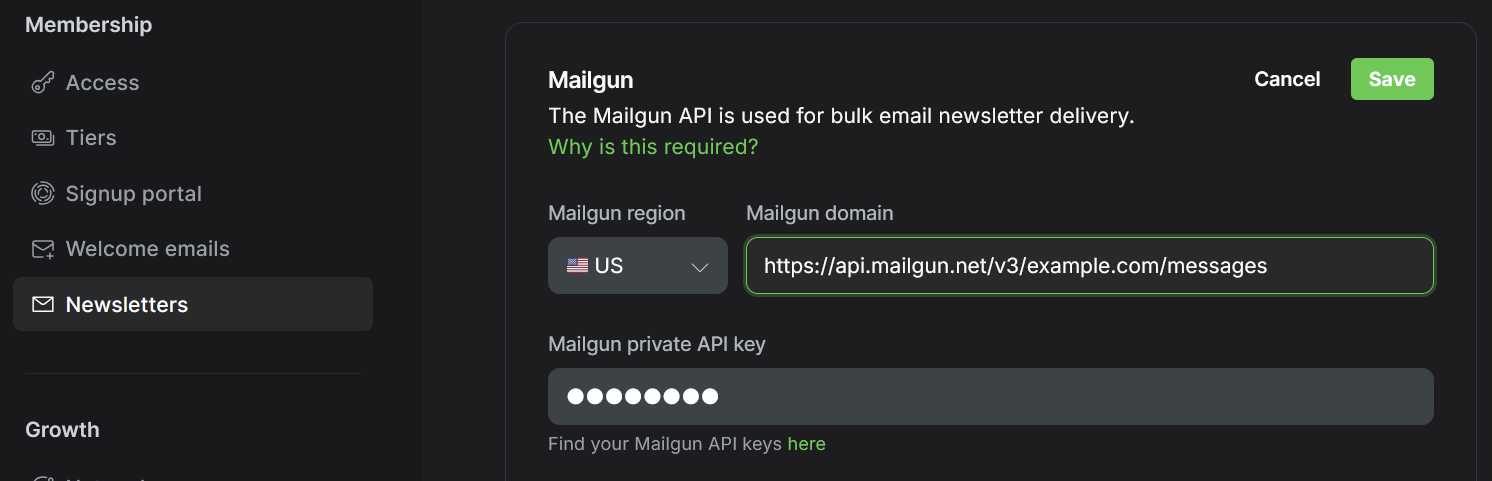
Hit Save and you're done!
7: Test it out!
Sign yourself up as a subscriber, reset your password, add a comment to this article, it should email me. 😀
As always, if you made it this far, thank you for reading!
If this helped you, please consider signing up and dropping me a comment letting me know someone is reading these 🙃
And again, thank you!!